
This one may seem complicated, but it’s easier than it looks, especially if you’ve mastered the HST and Stitch & Flip methods, which you should have by now. If you still think HST stands for High Speed Train you may want to brush up on Block 1 before attempting this one.
Block 4: Ribbon Star
Finished Size 12″ (Unfinished 12-1/2″)
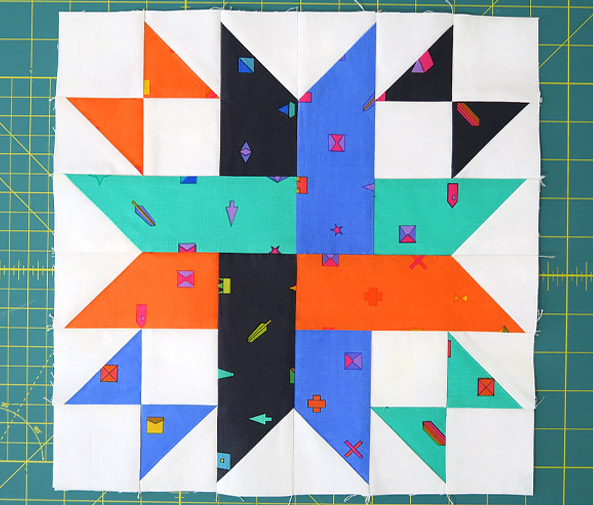
This month’s block is Ribbon Star and we are going to use both the Half Square Triangle and the stitch and flip methods when we make this quilt block. I’m going to show you how I made mine.
CUTTING
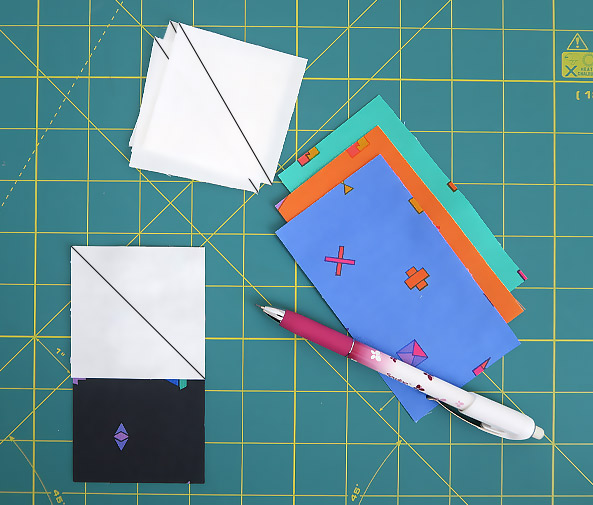
You will need four strong, contrasting fabrics for this block or the ribbon lines won’t show up. I used very strong colours but you could use any fabrics that contrast well – patterns and plains, dark and light, just have fun and make it your own.
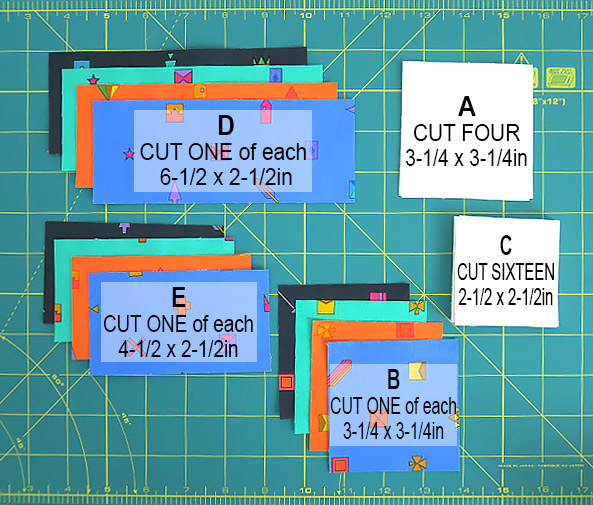
A. Four 3-1/4″ x 3-1/4″ squares (White)
B. One of each colour 3-1/4″ x 3-1/4″ squares (Blue, Orange, Teal, Black)
C. Sixteen 2-1/2″ x 2-1/2″ squares (White)
D. One of each colour 6-1/2″ x 2-1/2″ rectangles (Blue, Orange, Teal, Black)
E. One of each colour 4-1/2″ x 2-1/2″ rectangles (Blue, Orange, Teal, Black)
In this block the background fabric is A & C.
BLOCK ASSEMBLY:
- All seams are 1/4″ and I use a stitch length of 1.8.
- As a rule, you would press your fabric seams towards the dark side (darker fabric). I finger press my seams before pressing with an iron. This allows you to change the seams’ direction if needed without stretching your fabrics.
- In bulky areas press your seams open as this will help reduce thickness.
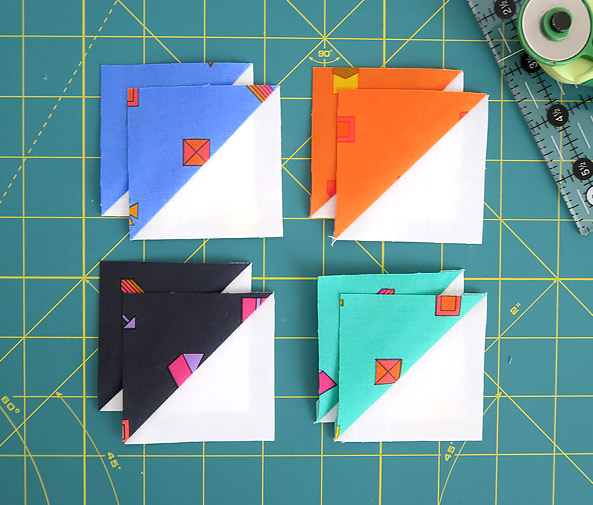
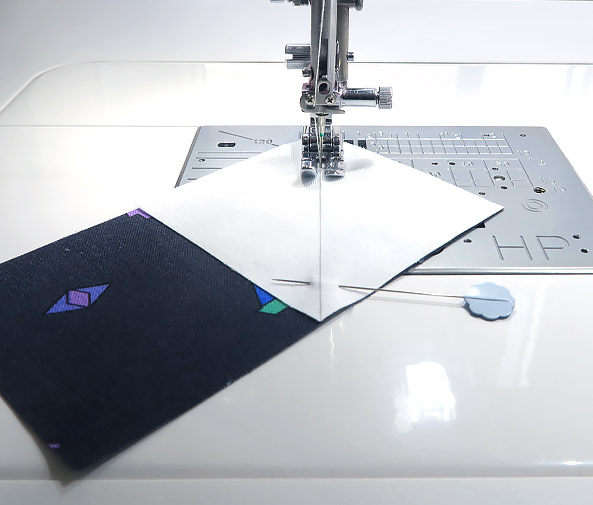
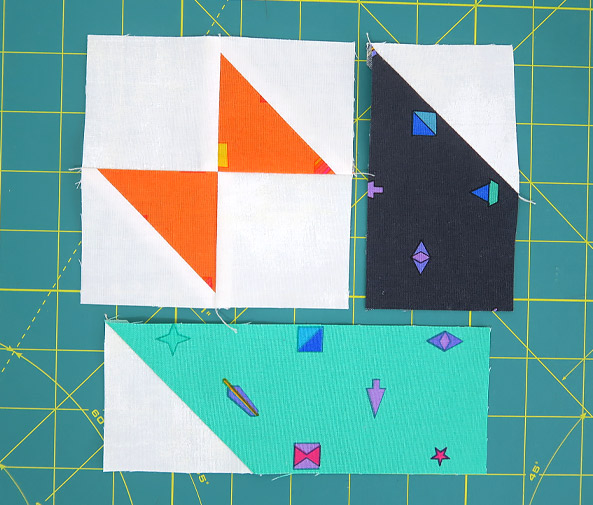
We are going to start by making eight Half-Square-Triangle (HST) units – I will be making my HST’s a little larger than they need to be and trimming them to size. You should be familiar with this technique but if you need to see my method in more detail check out Block 1.
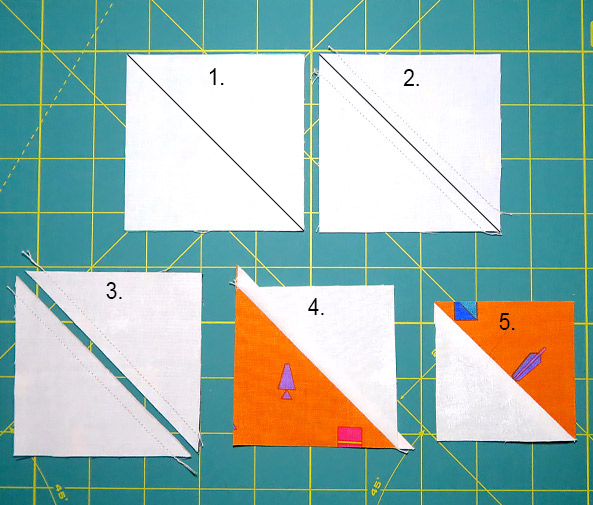
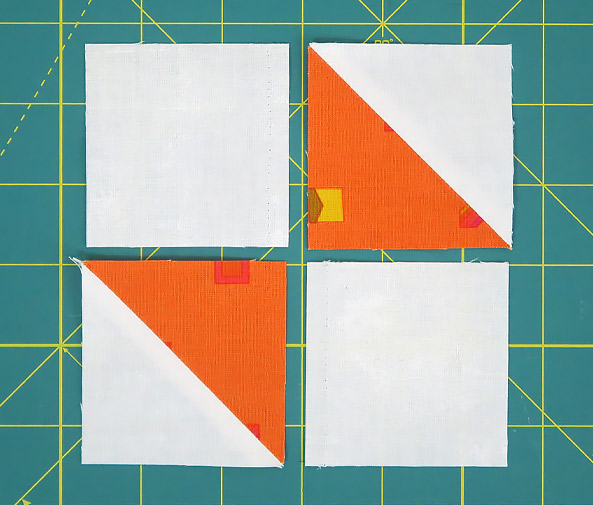
1. Draw a diagonal line on the wrong side of one of your 3-1/4″ x 3-1/4″ fabric A squares. Then take one of your coloured fabric B squares and place it right sides together with your fabric A.
2. Sew 1/4″ away from each side of the diagonal line.
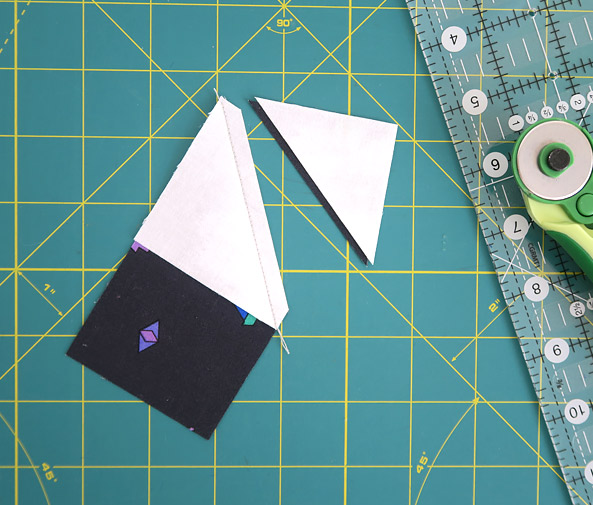
3. Cut apart on the marked line to make two HST’s.
4. Open and finger press your seam to the light side. 5. Trim your HST by placing your ruler’s 45° diagonal line along your seam line, squaring up your block up to 2-1/2″ and trimming away the excess fabric.
Repeat this method with all your remaining coloured and white 3-1/4″ squares to make eight HST’s.
Now we are going to make the rectangle units using the ‘stitch and flip’ method, starting with the small rectangles.
Draw a diagonal line, top left to bottom right on the wrong side of four of your fabric C squares. Then place one of them right sides together (RST) on top of one of your fabric E rectangles lining up the top and sides. Stitch on the line.

Next trim away the excess corner fabric leaving a 1/4″ seam allowance. Then open the unit and finger press the seam to the light side. Repeat this method with your remaining small rectangular fabrics (E) make sure all your fabric C triangles are all sewn the same way top left to bottom right so all your triangles are on the right-hand side of all of your units. You should have four.
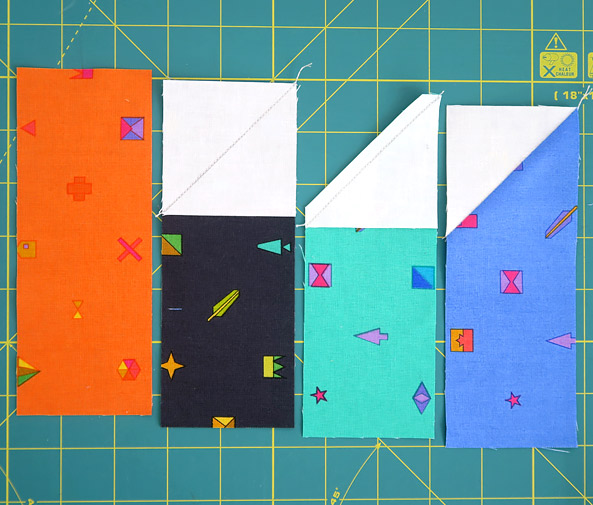
Repeat this method with your longer rectangular fabrics D but this time draw your diagonal line, top right to bottom left. Make sure your triangles are on the left-hand side of all of your units. You should have four.
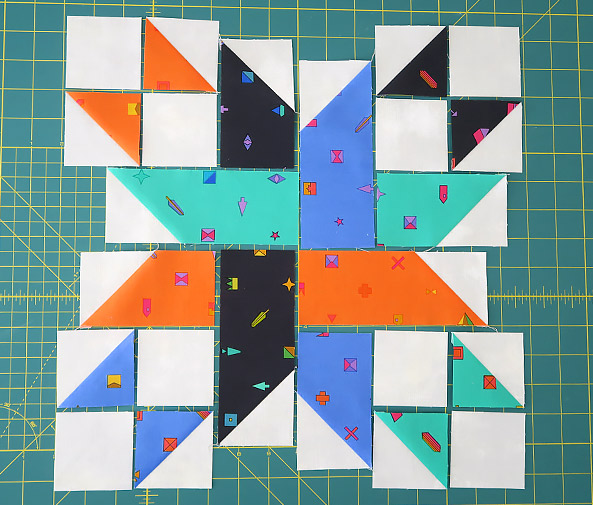
Now lay all your units into the Ribbon Star Block as it will help you sew everything together correctly.
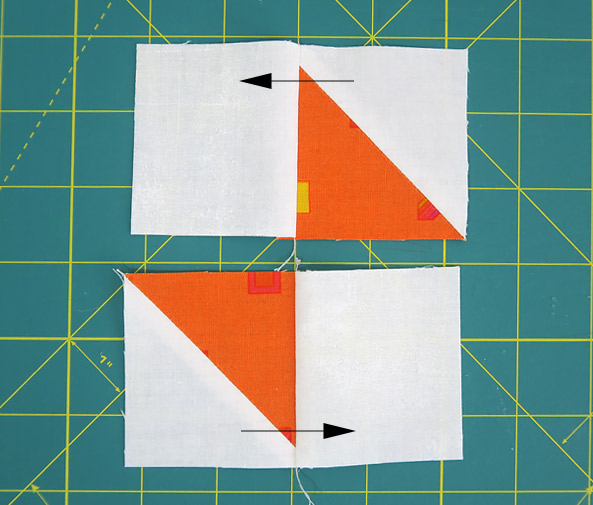

Take two HST’s and two fabric C squares from the corner of your block and sew the top two together and then the bottom two together to form two rows. Make sure that your seams are pressed in the right direction – see image above. Then nestle the centre seams together and sew both rows together.
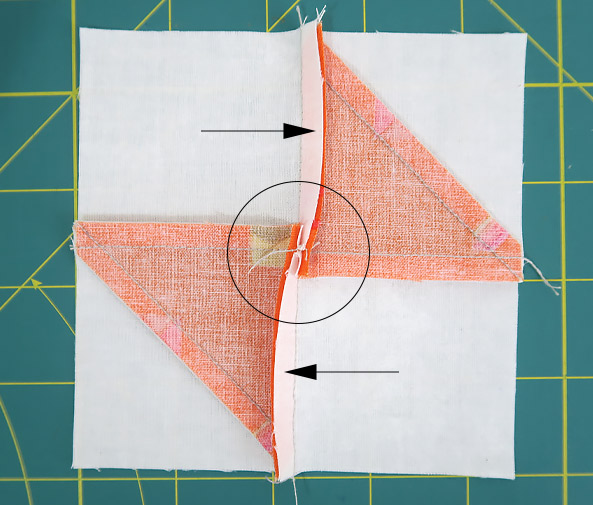
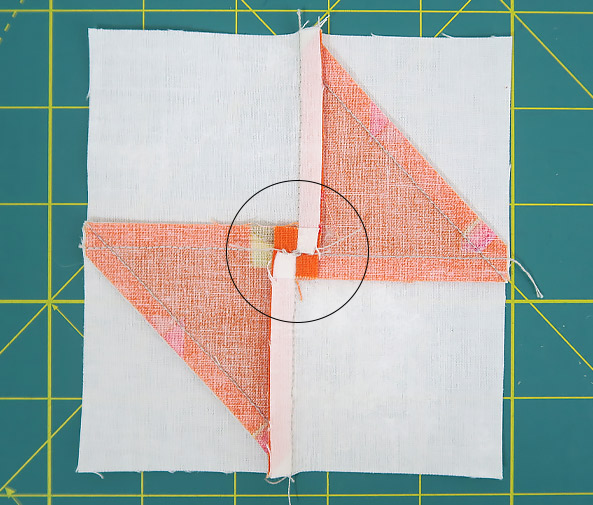
Now we are going to twirl the seam so that it will lay flat. Push your seam in opposite direction paying attention to the centre point you may need to unpick one or two stitches to get the seam to open fully. Finally, use your iron to set your seams in place.
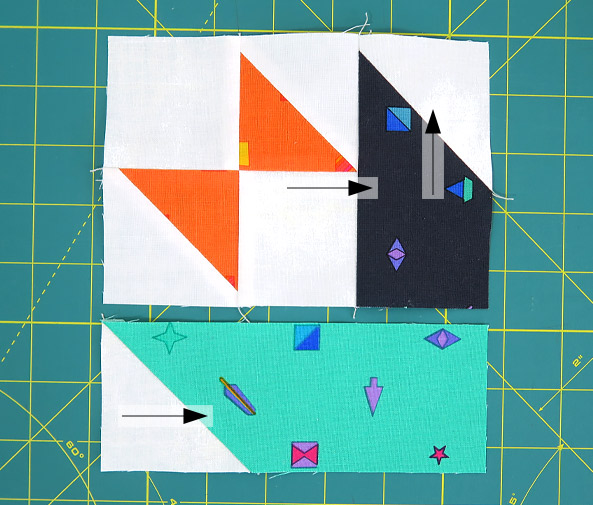

Now take one small rectangle (make sure the seam is pressed up to the light side) and sew it to the four patch. Now finger press your seam to the dark side. Then take the long rectangle (make sure the seam is pressed down to the dark side) and sew together with the other two pieces, finger pressing your seam to the dark side. Your block should measure 6-1/2″ square. When finished use your iron to set the seams.
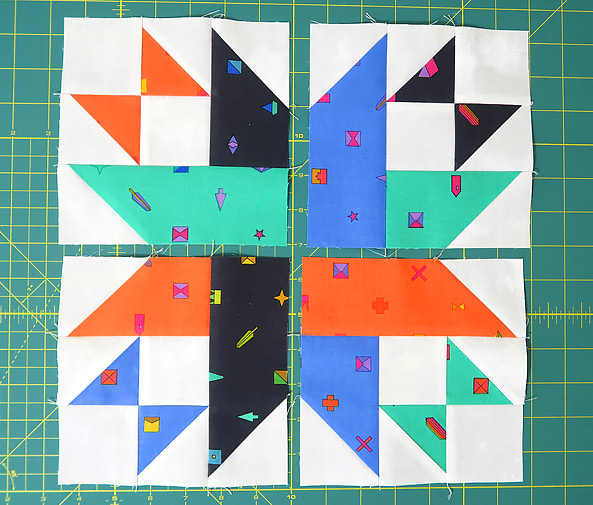
Repeat this process three more times to make your four corner blocks.
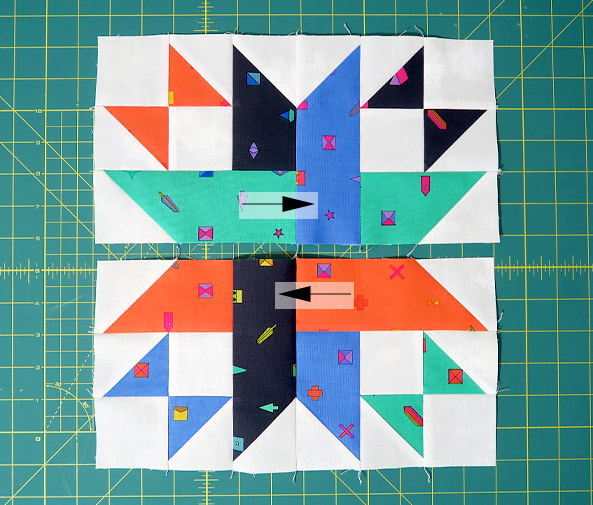
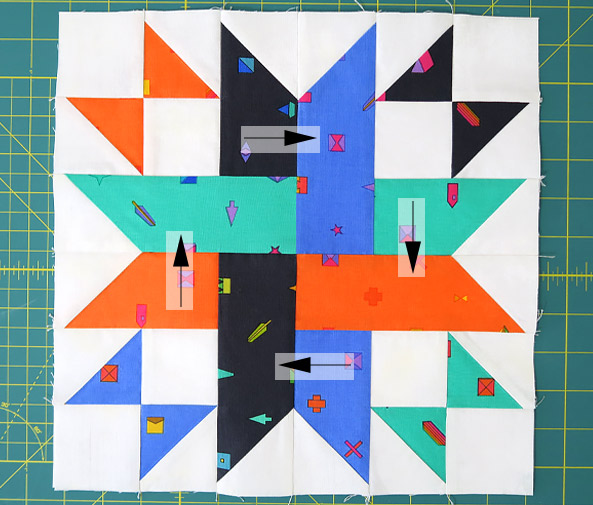
Now join the top two units, making sure that your seams are nested together with points on adjacent blocks aligned before sewing to make a perfect ‘V’. Then press your seam in the direction of the arrows in the pictures above. Repeat for the bottom two units, pressing in the opposite direction. Finally sew your rows together, again nesting your seams to make a perfect ‘V’. Fix your seams by pressing on the wrong side in an anticlockwise direction and twirling the centre open to create a flat seam.
If you have sewn your block together accurately it should measure 12-1/2″ square, but if you need to trim it make sure you leave 1/4″ seam allowance on all your triangle points.
Yay!… you have finished your fourth block.

