Well, you’ve finally made it, you’ve reached the last block. With Christmas just around the corner, what better note to finish on than with a Poinsettia block, a symbol of Christmas itself. We’ll give you a little time to complete this block before helping you to pull everything together into a finished quilt – finishing instructions on the way soon…
BLOCK 12: Poinsettia
Finished Size 12″ (Unfinished 12-1/2″)

The last block of our sew along is the Poinsettia quilt block. This block is made from squares and Half Square Triangles. I’m going to show you how I have sewn this block together. As always accuracy is key, so take your time and don’t rush, after all you have a month to complete it!
CUTTING
There are a few triangles so try not to stretch your fabrics when you press. You will need a few fabric colours for this flower quilt block and a background fabric. I chose a selection of reds, greens and golden yellow but you could choose anything you like. It will look fabulous whatever you choose.

A. Two 2-1/2″ x 2-1/2″ squares (Light Red)
B. Four 2-1/2″ x 2-1/2″ squares (Red)
C. Two 2-1/2″ x 2-1/2″ squares (Dark Red)
D. Three 2-1/2″ x 2-1/2″ squares (Yellow)
E. Four 2-1/2″ x 2-1/2″ squares (Green)
F. Five 2-1/2″ x 2-1/2″ squares (White)
G. One 3-1/4″ x 3-1/4″ square (Light Red)
H. One 3-1/4″ x 3-1/4″ square (Red)
I. Two 3-1/4″ x 3-1/4″ squares (Dark Red)
J. Three 3-1/4″ x 3-1/4″ squares (Green)
K. Five 3-1/4″ x 3-1/4″ Squares (White)
L. One 4-3/4″ x 4-3/4″ Square (White)
M. One 1-1/8″ x 7″ Rectangle (Black)
In this block the background fabrics are F, K, & L
BLOCK ASSEMBLY:
- All seams are 1/4″ and I use a stitch length of 1.8.
- As a rule, you would press your fabric seams towards the dark side (darker fabric). I finger press my seams before pressing with an iron. This allows you to change the seams’ direction if needed without stretching your fabrics.
- In bulky areas press your seams open as this will help reduce thickness.
We are going to begin by making all of our half square triangles (HST). We will be making everything larger, then trimming to size so that our units are all accurate.


We are going to make two at a time HST’s and we are going to make a few different colour combinations. I will remind you how to do the first one then list all the combinations below.
Take one 3-1/4″ x 3-1/4″ white fabric (K) and draw a diagonal line on the wrong side from corner to corner. Next take one of your 3-1/4″ x 3-1/4″ green fabrics (J) and place it right sides together (RST) with your white fabric. Then sew 1/4″ away from each side of the diagonal line.
Cut apart along your central line to make two HST’s.
Open your triangles and finger press your seam to the dark side then set them with an iron.

Next trim your HST’s to 2-1/2″ by placing your ruler’s 45° diagonal line along your seam line, squaring up your blocks, and trimming away the excess fabric.
Repeat once more making a total of four white and green HST’s.
Repeat this process using the combinations below to make the following HST’s.

One green (J) and one dark red (I) 3-1/4″ squares will make two green and dark red HST’s.
One white (K) and one dark red (I) 3-1/4″ squares will make two white and dark red HST’s.
One white (K) and one red (H) 3-1/4″ squares will make two white and red HST’s.
One white (K) and one light red (G) 3-1/4″ squares will make two white and light red HST’s.


Now we are going to make the bottom right-hand corner. Take your large 4-3/4″ x 4-3/4″ white fabric square (L) and on the wrong side draw a diagonal line from corner to corner. Then draw a line 1/4″ on either side of that central line.
Then cut along the central line with your rotary cutter.
Find the middle point on the long edge of your triangle by folding it in half and matching all the edges and make a little crease or mark the edge with a marker. Now find the central point of the long side of your black 1-1/8″ x 7″ fabric rectangle (M). With RST match your centre points, use pins to keep the edges together and sew along your drawn line.
Open your triangle and finger press your seam to the dark side then set with an iron.
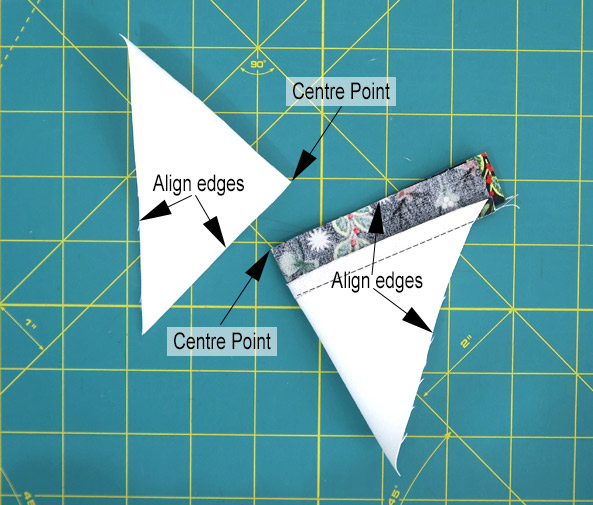


Now find the central point of the long sides of both your triangles by folding in half and aligning the open edges, mark or crease the centre point.
Now place RST matching up your edges then sew along your drawn line.
Open your triangle and finger press your seam to the dark side before setting with an iron.


Now trim your unit to 4-1/2″ by placing your ruler’s 45° diagonal line along the line of your stem and trim away the excess fabric.

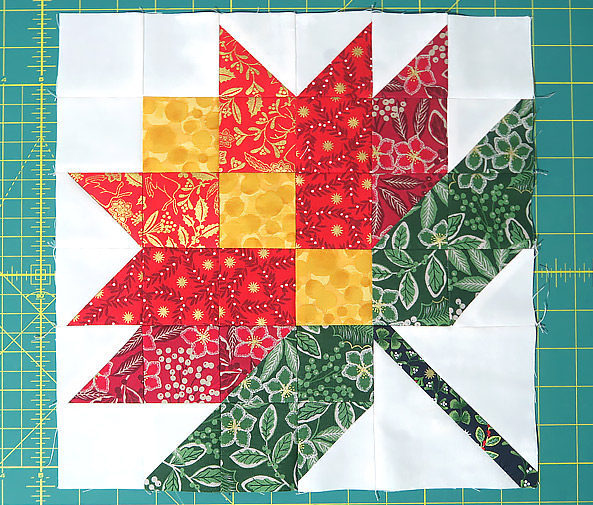
Now lay out all your squares to form the Poinsettia quilt block. Make sure that everything is the right way round and in the right place.

Keeping your fabrics in order, sew all your 2-1/2″ squares together one row at a time. Finger press your seams in each row in the direction of the arrows then fix with an iron (see image above).


Now sew the bottom two rows together nesting each vertical seam together as you go. Use pins if needed. Once sewn finger press your seam open and then fix with an iron.
Join your large corner square to the bottom two rows of your block. Then finger press your seam open and fix with an iron.
Next join your remaining rows together nesting your seams together as you go. Finally open out your seams and finger press before fixing with your iron.
If you have sewn your blocks together accurately you should have a lovely stack of quilt blocks all measuring 12-1/2″ square. If you need to trim any make sure you leave 1/4″ seam allowance on all your points.
Congratulations!… you have finished your twelfth and final block.

