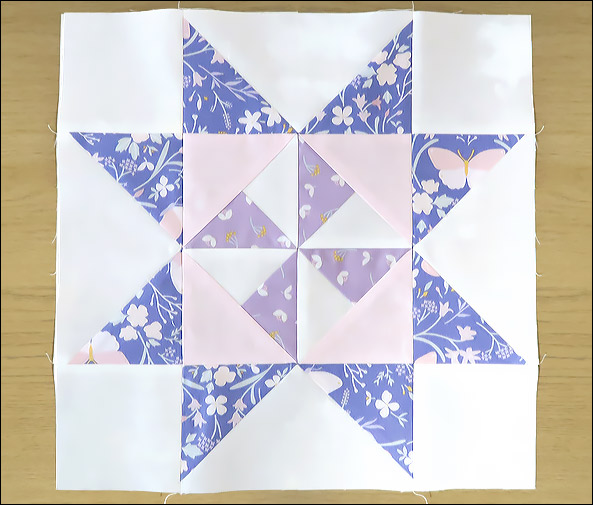
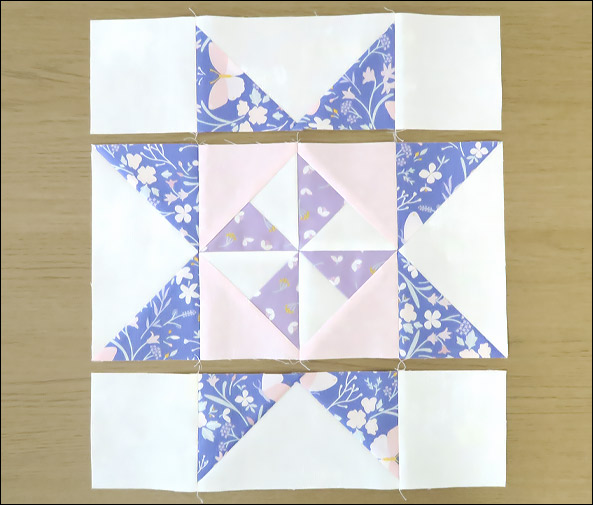
Block 7 is here. This one is the Pinwheel Star, named for its central windmill style block. There are some new techniques in here, so enjoy this one. Don’t worry, they’re not too challenging, in fact the hardest thing to remember is their names!
PINWHEEL STAR QUILT BLOCK
Finished Size 12″ (Unfinished 12-1/2″)
Our seventh quilt block is the Pinwheel Star and it has been made with ‘Flying Geese’ units. The centre is made from a ‘Split Quarter Square Triangle’ unit, also known as a ‘Half Quarter Square Triangle’.
CUTTING
This pretty little block has been made in blues, pinks and lilacs.

A. Four 6-3/4″ x 3-3/4″ rectangles (white)
B. Eight 3-3/4″ x 3-3/4″ squares (blue)
C. One 4-3/4″ x 4-3/4″ square (white)
D. One 4-3/4″ x 4-3/4″ square (lilac)
E. Two 4-3/4″ x 4-3/4″ squares (pink)
F. Four 3-1/2″ x 3-1/2″ squares (white)
The background fabrics for this block are A, C & F.
BLOCK ASSEMBLY:
- All seams are 1/4″ and I use a stitch length of 1.8.
- As a rule, you would press your fabric seams towards the dark side (darker fabric) but not always. I finger press my seams before pressing with an iron. This allows me to change the seams’ direction if needed without stretching my fabrics.
- In bulky areas press your seams open as this will help reduce thickness.
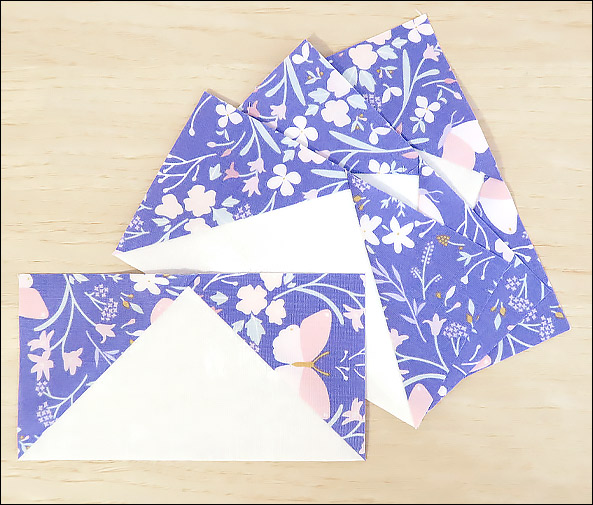
So, let’s get started, first our flying geese units. I’m going to make them a little oversized and then trim them to the exact size. This small loss of fabric will help us to achieve the correct sized completed quilt block.

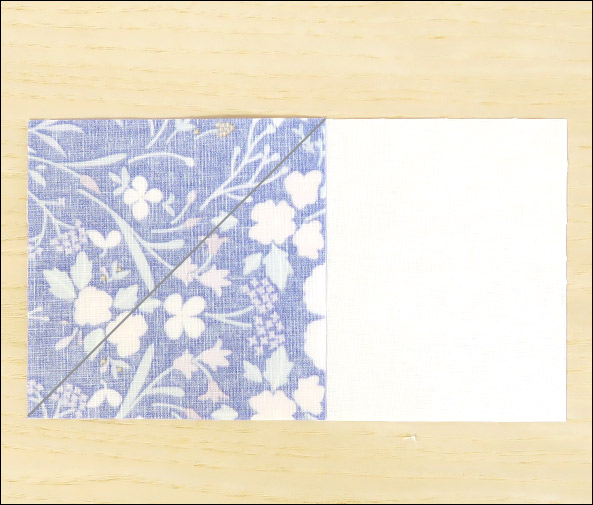
Take one of your 6-3/4″ x 3-3/4″ white rectangles fabric A and two 3-3/4″ x 3-3/4″ blue fabric squares B. Now draw a diagonal line from corner to corner on the wrong side of your two blue fabric B squares.
Then place one of them right sides together (RST) on top of your fabric A rectangle, lining up the left-hand side and top. Stitch on the line.
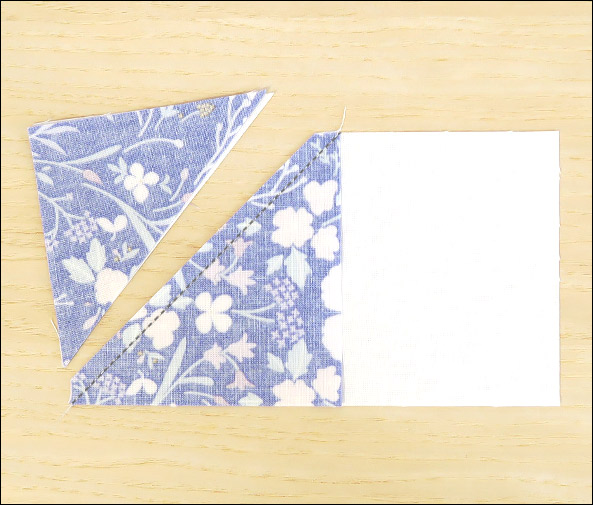
Next trim away the excess corner fabric leaving a 1/4″ seam allowance. Now finger press the seam to the dark side (fabric B), then press with your iron to fix.
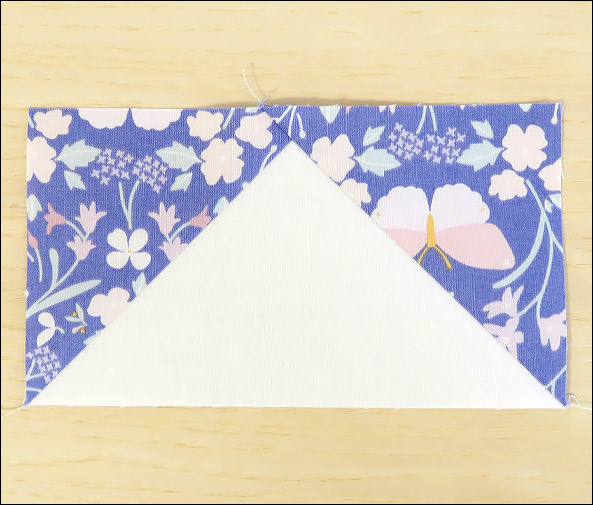
Repeat for the right-hand corner by placing the other fabric B square RST on top of fabric A, lining up the right-hand side and top. Stitch on the line. Trim away the excess corner fabric leaving a 1/4″ seam allowance. Then finger press your seam to the dark side and fix with your iron.
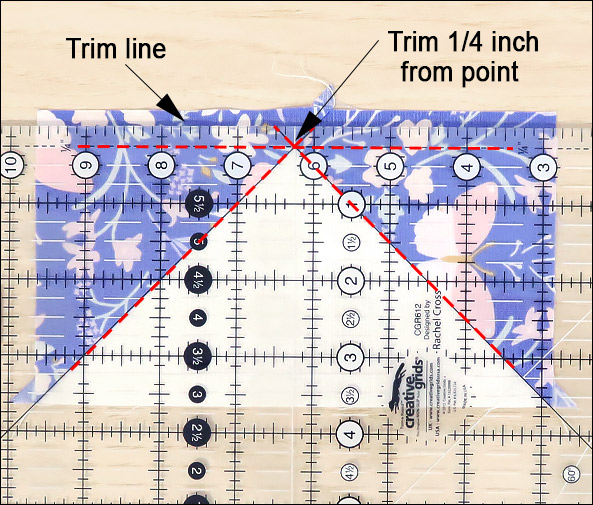
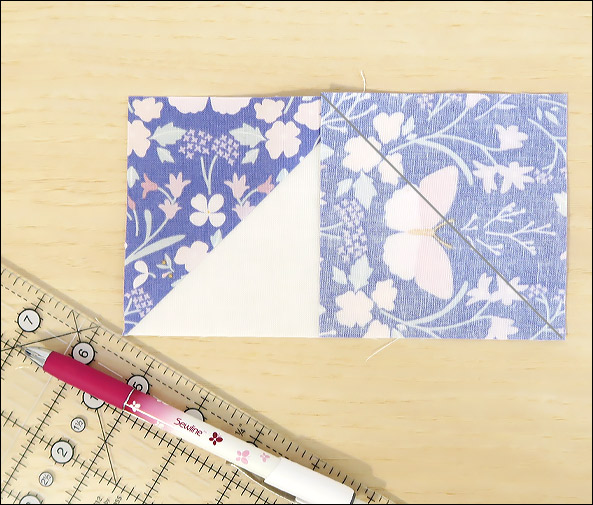
Now it’s time to trim your Flying Geese units to the correct size 6-1/2″ x 3-1/2″. Line up your ruler so that it sits 1/4″ away from your white triangle point making sure your ruler is aligned as straight as possible. I have used the 45° diagonal lines on my ruler to line up my block before trimming away the excess fabric, but if your ruler doesn’t have 45° diagonal lines make sure your ruler is as straight as possible by using its line markings to help you. When you are happy it’s straight, trim!

Trim away all the remaining excess fabric so your flying geese unit measures 6-1/2″ x 3-1/2″. I used the 45° lines on my ruler to square my flying geese unit up before trimming but if you don’t have these markings line up your ruler so that its 3-1/4″ line runs through the centre of your block vertically.
The centre of this block is a pinwheel made from identical ‘Split Quarter Square Triangles’ (SQST) these units are also known as ‘Half Quarter Square Triangles’ (HQST). We are going to make these units slightly larger and then trim them to size for accuracy.
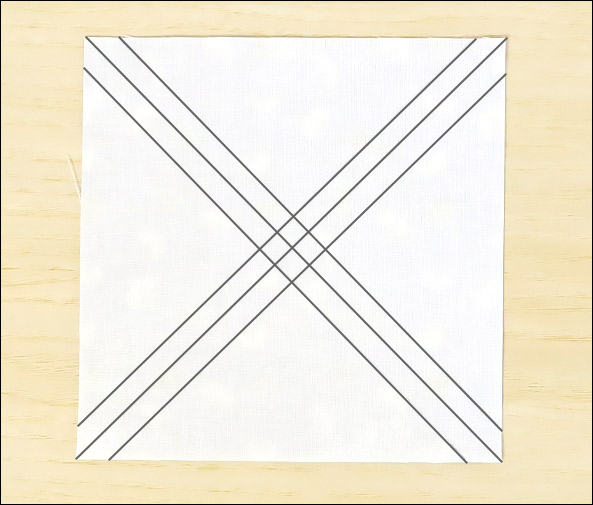
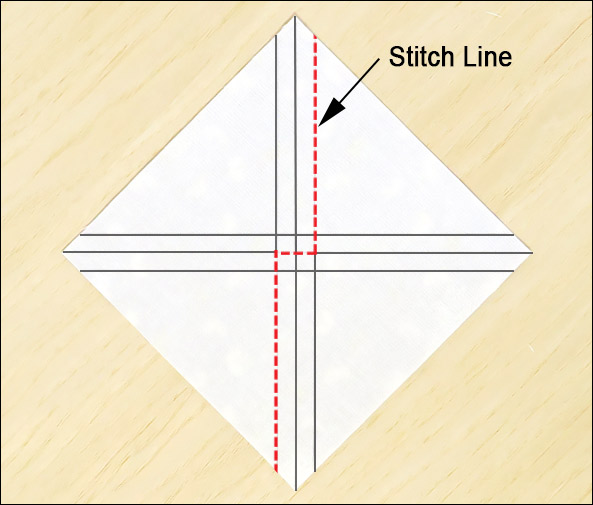
First the quarter square triangles. Take your 4-3/4″ x 4-3/4″ square of white fabric C and draw a line across both diagonals, then draw lines on both sides 1/4″ away from your centre lines.
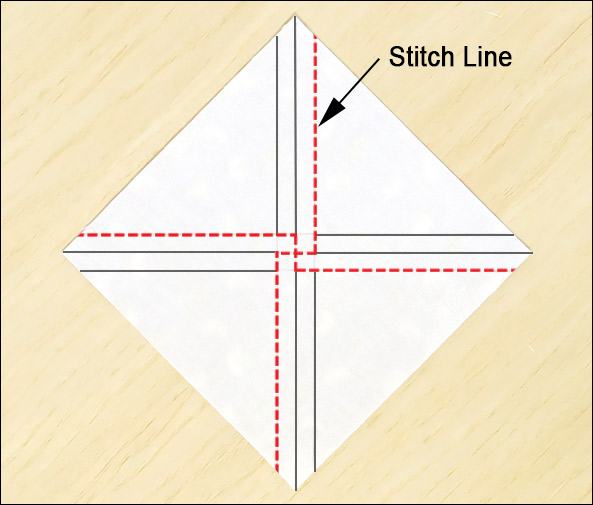
Now place on top of your 4-3/4″ x 4-3/4″ lilac square D with RST and pin. Sew on top of the right-hand line until you reach the centre line. Then pivot and sew across the square until you reach the left-hand line. Pivot again and sew down the left-hand line – see image above.
Turn your square around and repeat making sure you start on the right-hand side.

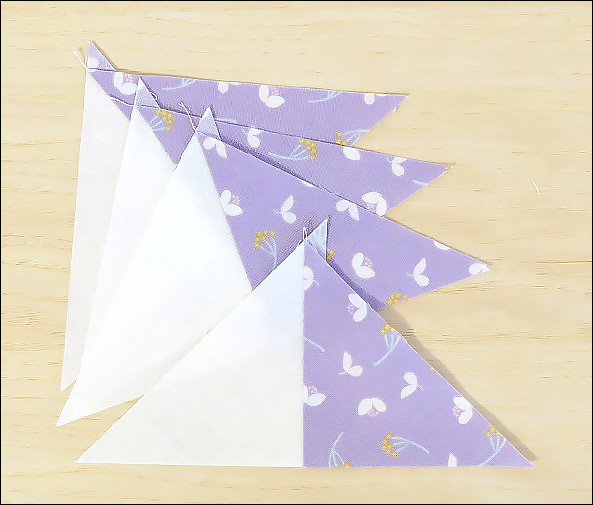
Now cut apart along your central drawn lines. Open your QST and finger press your seams to the dark side before setting with your iron.


Take your two 4-3/4″ x 4-3/4″ pink squares E and cut them in half diagonally, giving you four HST.
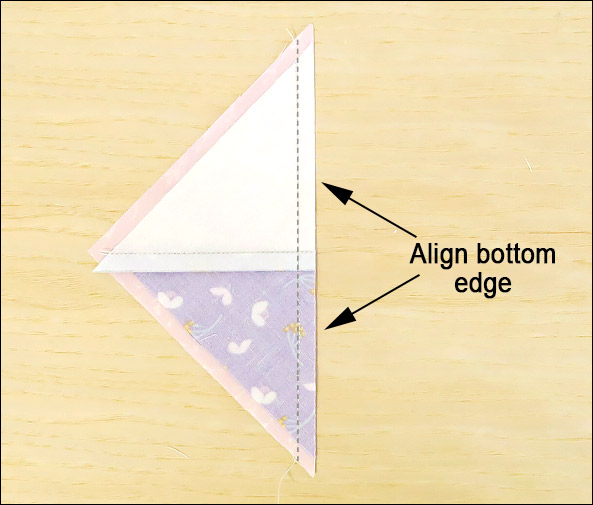
Place one of your QST on top of one of your HST RST, align the bottom edge and sew along the long edge – see image above. Open out your unit and finger press your seam towards the pink fabric before fixing with your iron.
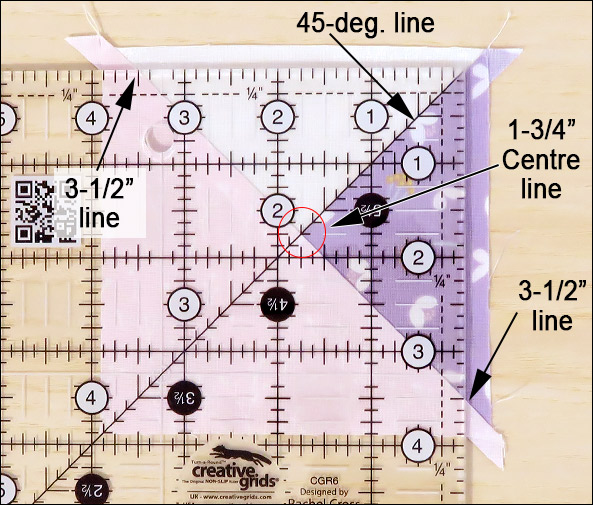

Now we need to square up our SQST units. Place your ruler with its 45-deg. line running along the seam line of the two small triangles, you should find that your ruler’s 1-3/4″ lines meet in the centre. Now look at the edges of your ruler, its 3-1/2″ lines should rest on the seam of the large triangle (see image above). Trim away excess fabric along the top and side, then turn your unit and repeat.
Now make three more SQST units, giving you a total of four.

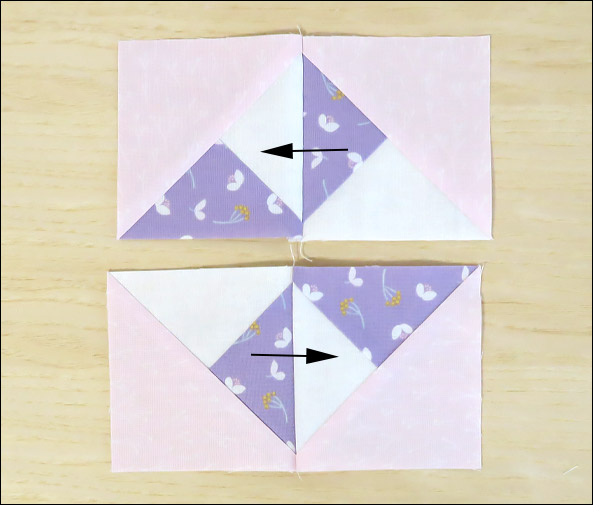
Arrange your SQST into a pinwheel, sew them together a row at a time, taking care to nest your seams and match your points.
Finger press your seams in the direction of the arrows before fixing with an iron.
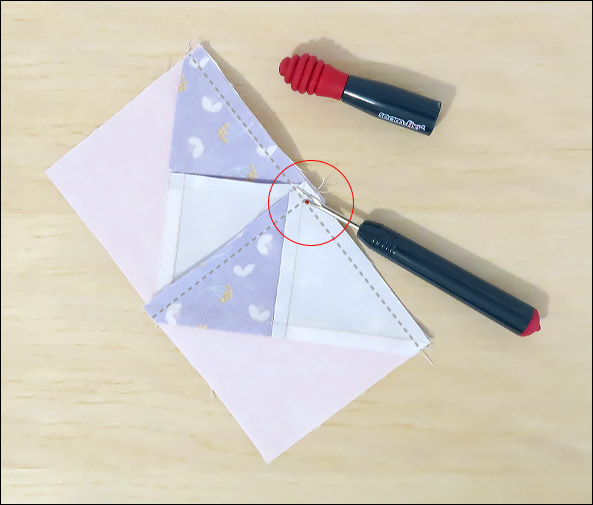
Then stitch your rows together. Before you open your pinwheel take your seam ripper and unpick the two or three stitches that lie above your horizontal seam, don’t cut them just unpick them. Do the same on the other side.

Turn your pinwheel over. All your seams should be pointing in a clockwise direction. Now press your block in a circle, as you get closer to the centre your seams should fall open to make a small pinwheel in the middle. Press flat.
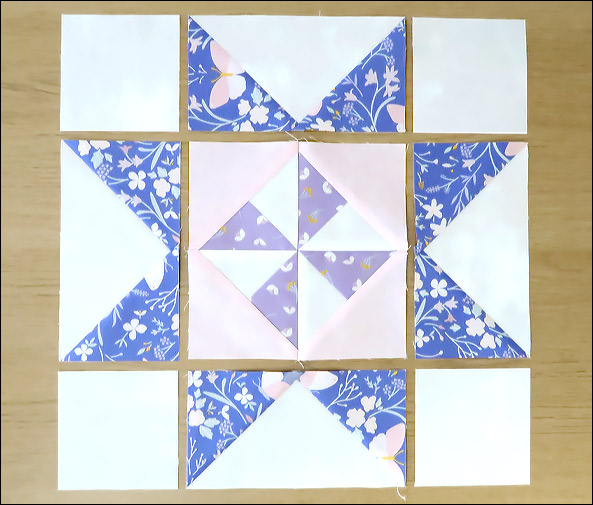
Now lay out all your units to form the Pinwheel Star quilt block. This will help you sew everything together correctly.

Keeping your fabrics in order, sew them together one row at a time, taking care to nest your seams and match your points. Finger press your seams open before fixing with an iron.
Finally sew your completed rows together pressing your seams open. Don’t forget to match your points and nest your seams together as you go.
If you have sewn your block together accurately it should measure 12-1/2″ square but if you need to trim it make sure you leave 1/4″ seam allowance on all your points. We are over halfway there!
You have just completed your seventh block.

