Well, this is the last post for our 2022 Quilt Along. Shed a tear if you will, jump for joy if you wish, but not before you have pulled all your hard work in making the individual blocks together. We have compiled assembly instructions and finishing suggestions here for you. We hope this Quilt Along has given you as much fun making it as we have had creating it for you.
QUILT ASSEMBLY
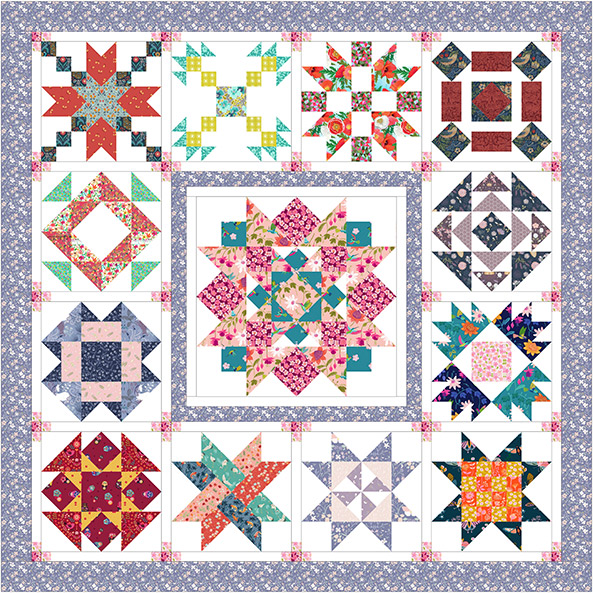
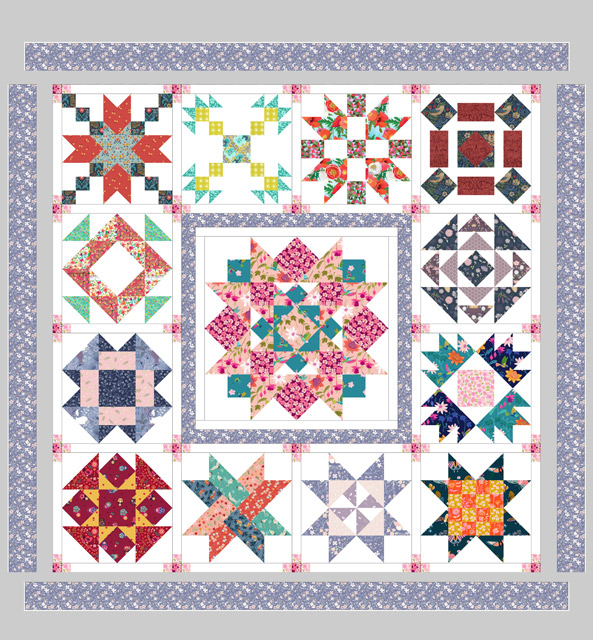
Finished Size Approx. 59″ x 59″
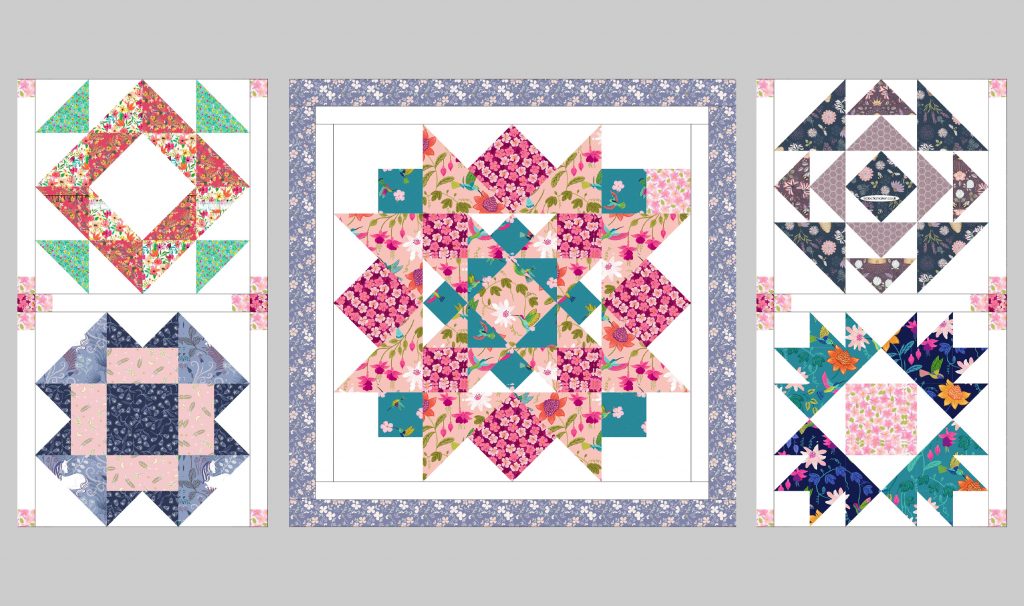
Now you have finished all your blocks it’s time to turn them into a quilt top. I have added sashing strips with cornerstones and also added borders to make up my quilt. If you do the same this will mean buying a little more fabric, unless you are lucky enough to have something suitable in your stash!
The colour of your sashing can change the whole look of your quilt. The colour you choose can make your sampler quilt blocks stand out or if you use the same colour for your strips as the background fabric your blocks will look like they are floating, the choice is yours. I have added an extra dimension to my sashing strips by adding colour to each end of them. Put together with cornerstones they make a cross shape to frame each of my blocks. I have used two colours for this but you could use one, just make it your own. This is a fabulous way of adding another dimension to your quilt.
FABRIC REQUIREMENTS
Sashing Strips – 0.60 metre
Sashing Strip Coloured Ends – skinny quarter
Cornerstones – fabric scraps or fat quarter
Inner and outer borders – 0.75 metre
CUTTING:
Make sure all your blocks are pressed nice and flat, square and all measure the same size, (12-1/2″ square).
NB: It is important that you cut all your sashing and cornerstones to the exact size of your blocks, so if your blocks are smaller or larger you will need to cut your sashing strips and cornerstones smaller or larger accordingly. This is important as it will help keep your quilt aligned and squared.
SASHING:
Cut your fabric for your sashing on the ‘straight of grain’ (parallel to the selvedge) as there is less stretch than if you cut them on the cross grain. This will also help to keep your quilt square and aligned.
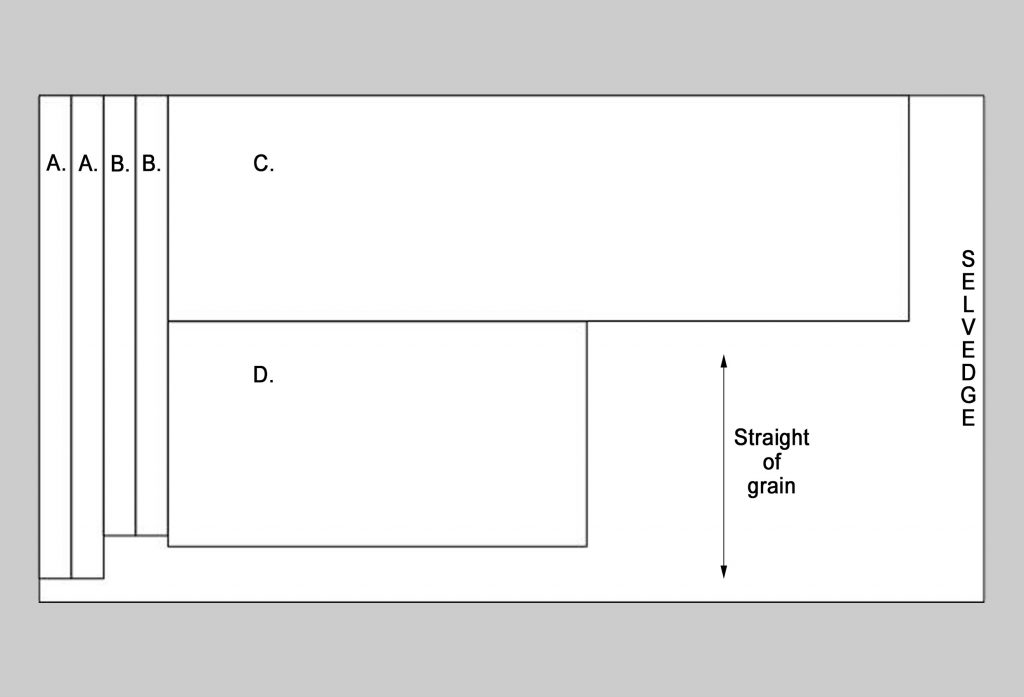
From your white sashing fabric cut the following on the straight of grain:
A. Two 1-1/2″ x 22-1/2″ strips
B. Two 1-1/2″ x 20-1/2″ strips
C. One 10-1/2″ x 34-1/2″ rectangle
D. One 10-1/2″ x 19-1/2″ rectangle
From the pink coloured fabric for your sashing ends cut the following:
E. Two 1-1/2″ x 34-1/2″ pink rectangles
F. Two 1-1/2″ x 19-1/2″ pink rectangles
From your dark pink cornerstones fabric cut the following:
G. Twenty-four 1-1/2″ x 1-1/2″ squares.
From your lilac border fabric cut the following:
H. Small Inner Border: Cut 3 strips of fabric 2″ by width of fabric (WOF).
I. Large Outer Border: Cut 6 strips of fabric 3-1/2″ by WOF.
QUILT ASSEMBLY:
- All seams are 1/4″ and I use a stitch length of 1.8.
- As a rule, you would press your fabric seams towards the dark side (darker fabric) but not always. I finger press my seams before pressing with an iron. This allows me to change the seams’ direction if needed without stretching my fabrics.
SASHING:
Step 1.

Take your white 10-1/2″ x 34-1/2″ fabric rectangle C and one of your pink 1-1/2″ x 34-1/2″ rectangles E and with right sides together (RST) align and pin the top edge, then stitch together. Finger press your seam towards the pink fabric and fix with your iron. Repeat on the bottom edge with your remaining pink fabric strip E. Your fabric should now measure 12-1/2″ x 34-1/2″.
Repeat the whole process with your white 10-1/2″ x 19-1/2″ fabric rectangle D and your pink 1-1/2″ x 19-1/2″ rectangles F.
Now take your ruler and cut your fabrics into sashing strips. Each strip should measure 1-1/2″ x 12-1/2″. You should get twenty-three from the large fabric and thirteen from the smaller. You should now have a total of thirty-six sashing strips.
Step 2.

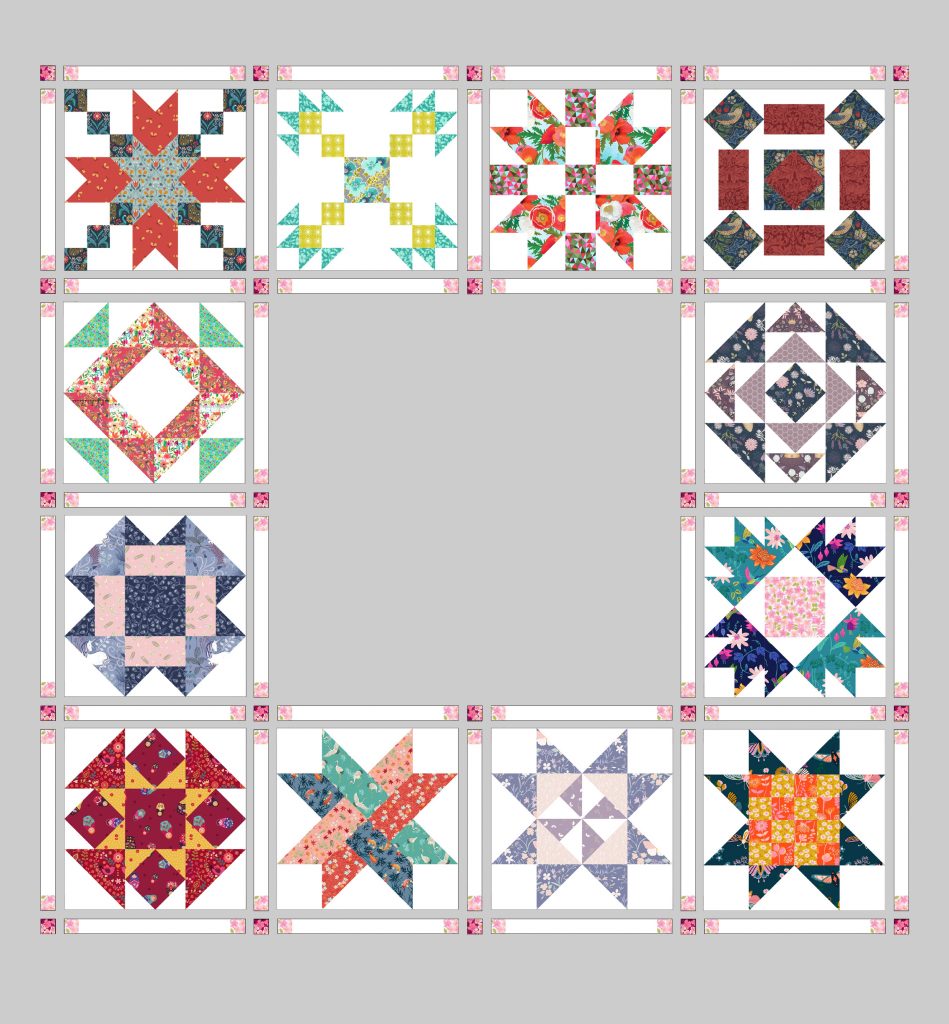
Lay out all your quilt blocks. It doesn’t matter what order they are in but think about their colours and shapes.
Then lay out all your 1-1/2″ x 12-1/2″ white and pink sashing strips and your 1-1/2″ x 1-1/2″ dark pink cornerstone so you are happy with your layout.
Step 3.
We will be sewing the quilt together in three rows, working from left to right, that way hopefully you won’t get lost. If it helps, number each block and/or take a photo on your phone.

First we are going to sew our top row. You will need pins to keep everything aligned, five of your 1-1/2″ x 12-1/2″ pink and white sashing strips and your first four quilt blocks.


Each of these rows starts and ends with a sashing strip.
Place a sashing strip RST on the left and right-hand side of your first block, turn it over and pin in place. Make sure your edges are aligned and you have pinned everything securely together, the more pins you use the less your fabric will travel when you sew. Put pins right at the ends as this will keep the top and bottom edges of your row level.
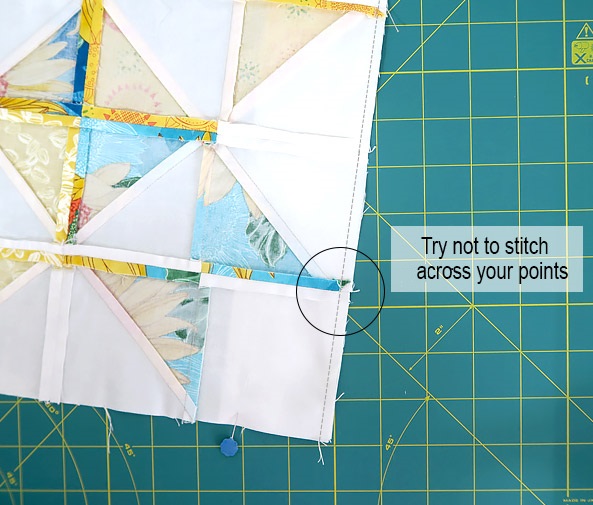
Now sew with the wrong side of your block facing up and your sashing strip underneath. This will allow you to see all your stitching and stop you losing your points. Don’t forget to remove your pins as you go. Now open your seams and finger press towards your sashing, being careful not to stretch your fabric, then press with your iron to set the seam. Now attach the next block and then the next sashing strip and so on until the row is complete.
Repeat this process with the bottom row of blocks.
Step 4.

After this, sew together all your cornerstones and sashing strips for the top and bottom rows, making sure you press your dark pink cornerstone fabrics towards the pink ends of your sashing strips. Make four in total.
Step 5.

Join your top cornerstone and sashing row to your block row, nesting your cornerstones as you go. Use plenty of pins and make sure you sew on the wrong side of your block with the cornerstone and sashing row underneath as this will help you see where all your points are. Then open your seams and finger press towards your sashing, being careful not to stretch your fabric, before fixing with an iron.
Now repeat with your bottom row. Both rows should measure 53-1/2″ x 14-1/2″.
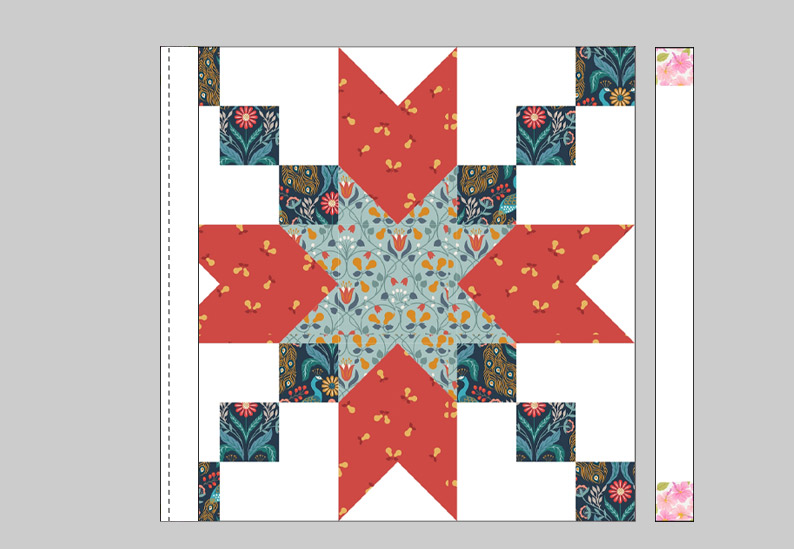
QUILT CENTRE:
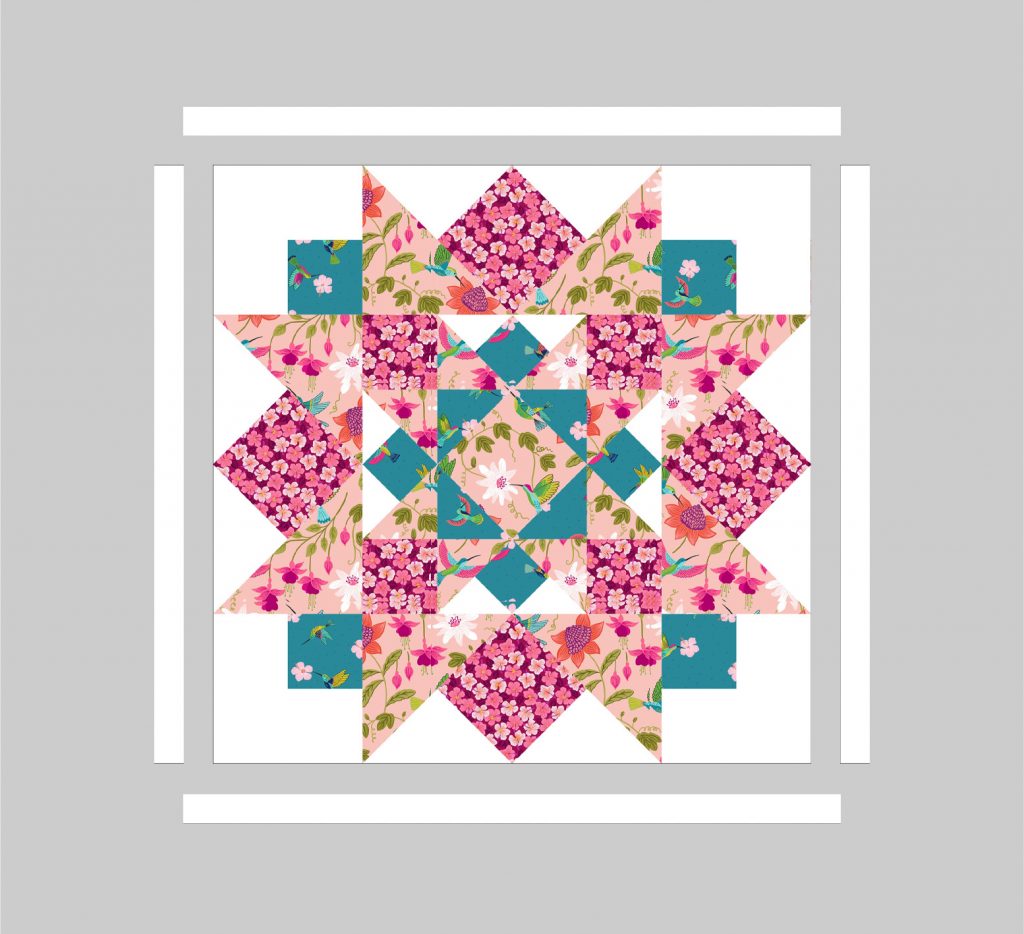

Take your centre block and your two white 1-1/2″ x 20-1/2″ fabric strips B. and your two 1-1/2″ x 22-1/2″ strips A.
Just like the sashing strips sew the two shorter strips to your centre unit. Use pins and sew with the wrong side of the block facing up and the fabric strip underneath. Keep an eye on your points. Finger press your seams out towards the edges before fixing with an iron. Then repeat with the remaining longer fabric strips.

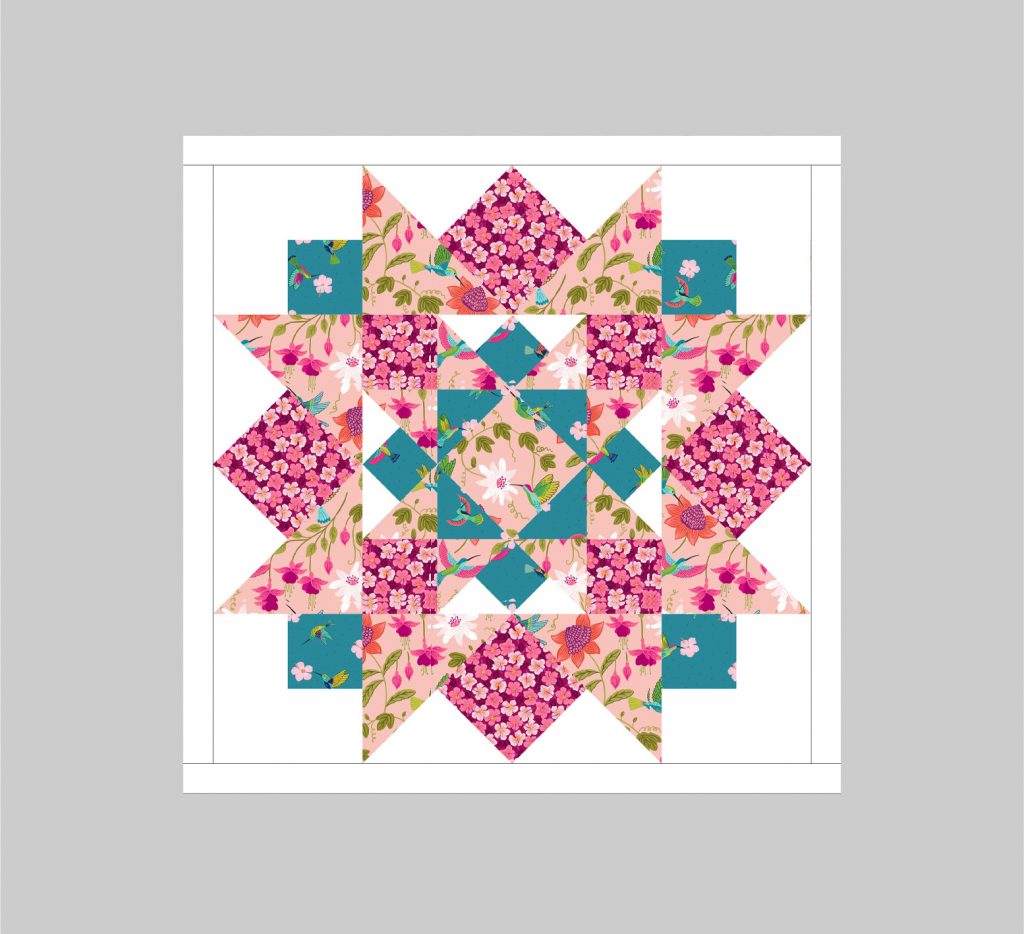
Then join your three lilac 2″ by WOF inner border strips H together with a 45-degree mitred joint, making sure you cut the selvedge off your fabrics as you go. Press your seams open. Then cut into the following sizes:
Two 2″ x 22-1/2″ strips
Two 2″ x 25-1/2″ strips
Just as before sew the two shorter strips on either side of your centre block. Then repeat with the remaining longer border strips I. Finger press your seams out towards the edges before fixing with an iron
Step 7.

Sew together your side blocks with your sashing strips and cornerstones (keep an eye on your points), using the method described earlier. Then join your side sections to the centre block, finger pressing your seams towards the inner border before fixing with an iron.
Step 8.

Sew your three rows together being careful to nest your cornerstones as you go. Use plenty of pins and make sure you sew on the wrong side of your central block rows with the cornerstone and sashing row underneath as this will help you see where all your points are. Then finger press towards your sashing, being careful not to stretch your fabric, before fixing with an iron. Your quilt should now measure 53-1/2″ square.
BORDERS:
It is important to measure all your quilt edges before you cut your borders. If you cut your sashing strips length of grain there shouldn’t be too much stretch but if you cut them WOF, measure through the centre of your quilt from the top to the bottom for the side borders. Then measure through the centre of your quilt from side to side to get the measurements for the top and bottom borders. Adjust as necessary.
Step 9.
Join all your 3-1/2″ by WOF outer border strips I into one long line with 45-degree mitred joints, make sure you cut the selvedge off your fabric as you go. Press your seams open.
Now cut:
Two 3-1/2″ x 53-1/2″ strips
Two 3-1/2″ x 59-1/2″ strips
Pin the two shorter strips evenly down each side of your quilt. I mark my borders and the edge of my quilt into four then pin each of the sections together, easing my fabric as I go and pinning about every inch and a half. Using lots of pins really does stop your fabric from traveling. When sewn, finger press your seam outwards towards the edge of your quilt and press with an iron.
Your quilt should now measure 59″ square.
Well done!… You have finished your quilt top.

Back, quilt and bind as desired.

